

Are you wondering how to make a GIF in Photoshop and bring your static images to life? Whether you're a content creator looking to spice up your social media posts, a marketer wanting to grab attention, or simply someone who loves animated visuals, you have landed in the right place.
This guide will take you through everything you need to know and help you learn how to create a GIF animation in Photoshop. Additionally, we will explore some alternative methods that may surprise you with their simplicity and creative results.
In this article
Part 1. How to Make a GIF with Photoshop from Pics
Creating GIFs in Photoshop is relatively easy for professionals but can be tricky for beginners. Follow this step-by-step guide to learn how to make a GIF in Photoshop with zero experience:
Step 1
Open Photoshop and navigate to "File > Scripts > Load Files into Stack."

Step 2
Once the images are added, click "Window" and navigate to "Timeline."

Step 3
Navigate to Timeline under the image you have uploaded. Click the drop-down menu located near "Create Video Timeline" and select "Create Frame Animation."

Step 4
In the Timeline panel menu (represented by a three-line icon), select "Create New Layer for Each New Frame." Each layer now becomes a frame in your animation.

Step 5
Below each frame, click the time and select the duration each frame should display (try 0.2-0.5 seconds to start).

Step 6
At the bottom of the Timeline, set the looping option to "Forever" for a continuous animation. Click the "Play" button to see the results.

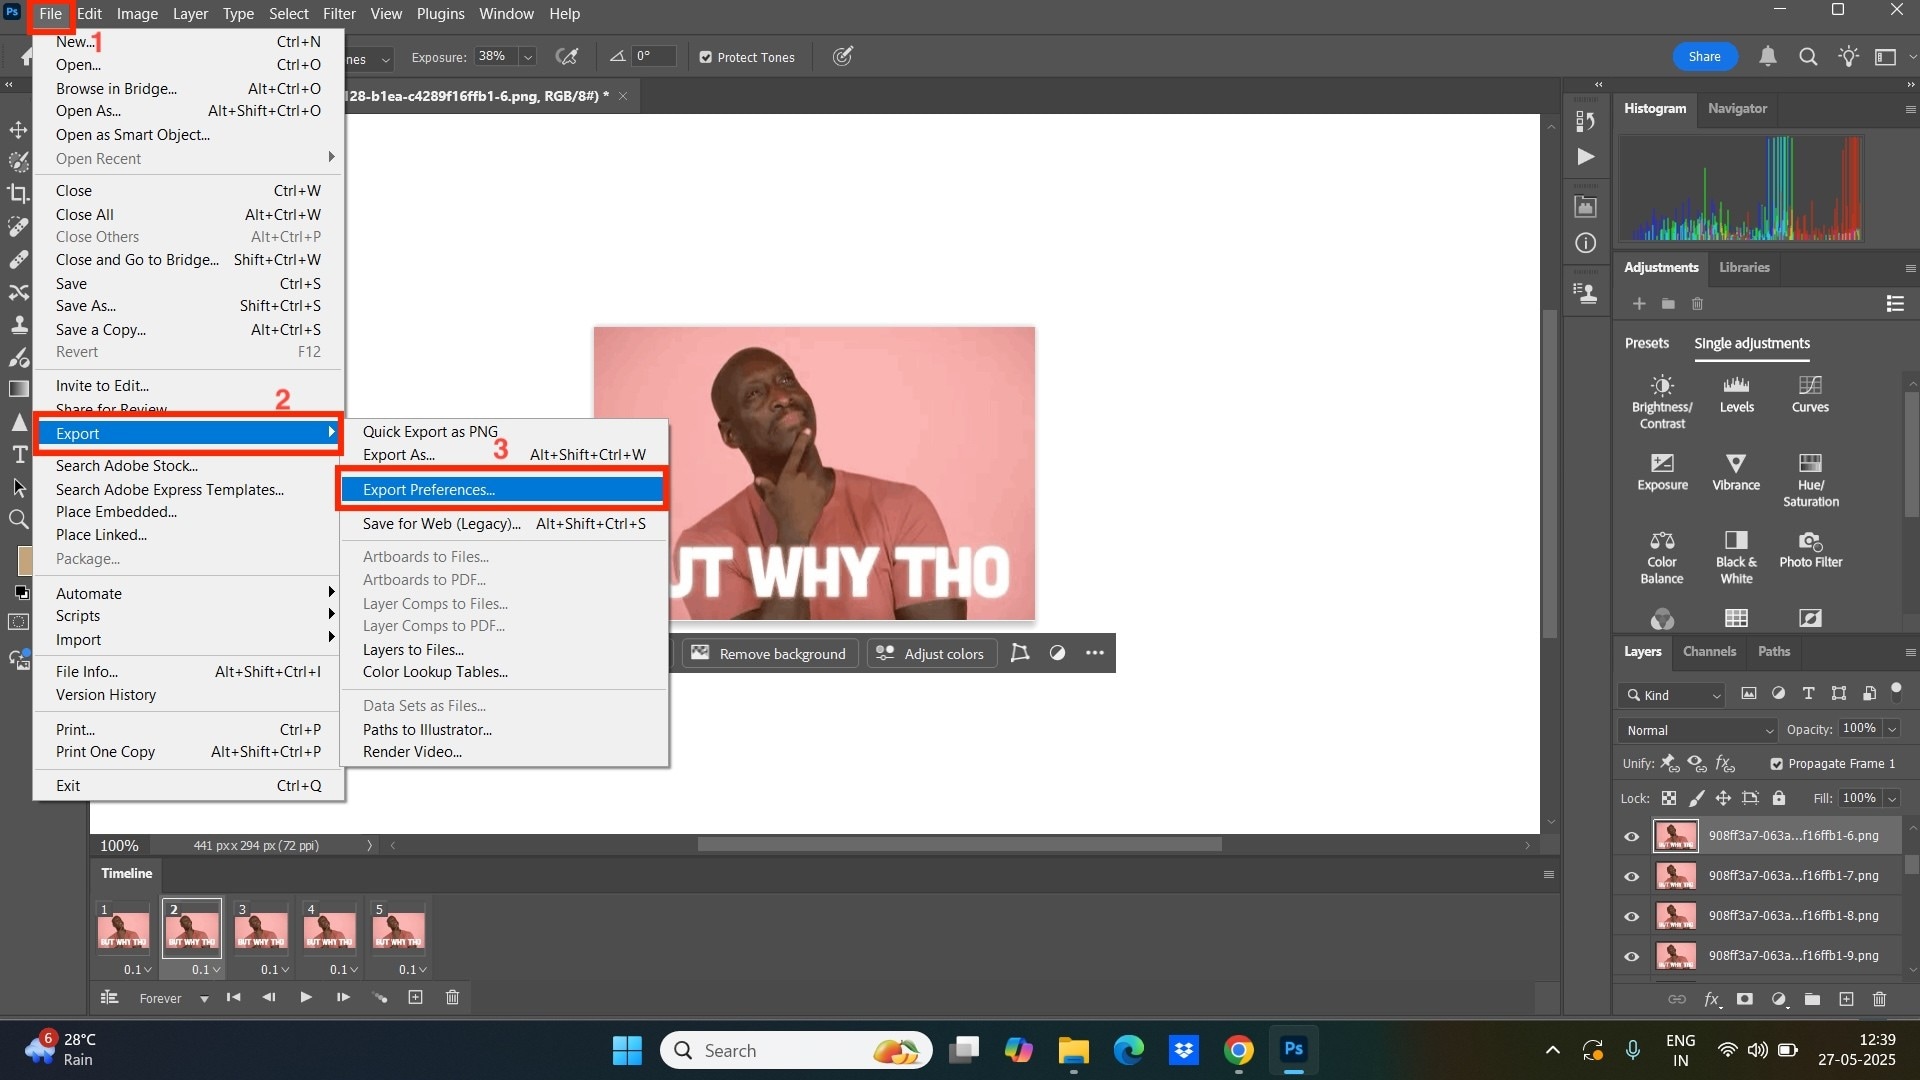
Step 7
Go to "File > Export Preferences" and save it as a GIF.
Part 2. Pros and Cons of Making GIFs in Photoshop
When you know how to make a GIF in Photoshop, knowing the pros and cons helps you better understand the tool and make the most of it. If it does not meet your needs as a beginner, you can explore other options for creating GIFs.
Pros & Cons

Easy to Use Image to GIF Maker for Win and Mac
Part 3. Easy Way: How to Make GIFs without Photoshop from Videos and Pics
Learning how to make a moving GIF in Photoshop is beneficial, but its complexity level and pricing might not be suitable for beginners; in this case, having a second option is always advisable. Here, Wondershare UniConverter's GIF Maker can be a time-saver, as it simplifies the GIF-making process with just one click. All you need to do is upload the photo, select the output size and frame rate (4-60), and click to create a GIF.

Key Features
- It allows you to create GIFs from images and videos with just one click.
- Not only with the GIF maker but also with its "Converter" feature, it lets you make GIFs in batches from videos.
- A wide array of frame rates is available, allowing you to choose from 4 to 60 frames per second to meet your needs.
- It supports various file formats, including JPG, PNG, JPEG, and BMP.
Here is how you can create a GIF with UniConverter
Step 1
Open the app and navigate to the homepage, then select "Image > GIF Maker."

Step 2
When you click "GIF Maker," you will be presented with two options: "Video to GIF" and "Image to GIF." Select the "Image to GIF" option and upload multiple images.

Step 3
After uploading the images, select the desired output size and frame rate, and then click "Create GIF." Your GIF is now ready to use and share.

Part 4. Pros and Cons of Making GIFs with UniConverter
Compared to Photoshop, UniConverter is far easier for both professionals and beginners. Here are the pros and cons that will help you make the right choice to create a GIF:
Pros & Cons
Part 5. Conclusion
Learning how to make a GIF in Photoshop opens up professional-grade animation possibilities, but it comes with complexity and cost considerations. While Photoshop excels in quality control and advanced editing, its steep learning curve can be overwhelming for beginners.
If you’re seeking simplicity without sacrificing results, Wondershare UniConverter emerges as the clear winner. Its one-click GIF creation, intuitive interface, and affordable pricing make it perfect for content creators, marketers, and casual users alike. Whether you choose Photoshop's professional power or UniConverter's user-friendly approach, you now know to bring your static images to life. Try UniConverter and see how it makes creating GIFs seamless.
Easy to Use Image to GIF Maker for Win and Mac
FAQs
-
1. How to create GIFs from photos?
To create GIFs from photos, you can try UniConverter. Upload the images to GIF Maker, adjust output size and frame rate, and click "Create GIF." -
2. Can Photoshop export an image as a GIF?
Yes, you can export an image from Photoshop as a GIF. Navigate to "File > Export Preferences" and select GIF from the drop-down menu. -
3. What is the best GIF setting for Photoshop?
The "Diffusion Dithering" option helps you reduce color banding and creates smooth gradients. You can adjust the percentage between 75% and 100% for best results. -
4. What is the difference between dither and no dither in Photoshop?
Dithering creates the illusion of more colors by mixing adjacent pixels of different available colors, producing smoother gradients. Not dithering is when the closest available color is assigned to each pixel, resulting in a more basic color representation with banding effects.


